|
DirectXGraphics:
Billboarding
Author:
Jack Hoxley
Written: 25th May 2001
Contact: [EMail]
Download: Graph_15.Zip
(181kb)
Contents
of this lesson
1. Introduction
2. The maths behind it all
3. Migrating this into D3D
1.
Introduction
Welcome
back for another lesson in the world of
Direct3D graphics. In this lesson we'll
learn how to build cutting edge graphics
into our games - without requiring a
super computer. Before you get excited
though, this isn't quite the answer to
everything - it only works in certain
cases, and doesn't always look perfect -
but it's a commonly used technique in
commercial games, so there's no reason
to avoid it.
When
you play any action game on the PC your
almost guaranteed to see an explosion at
some point - sometimes they are
breathtaking, other times they are
fairly lame excuses for explosions -
either way, with the techniques and
skills you've learnt in this series
you'll be aware that something clever
must be happening. The only way we've
learnt so far to replicate an explosion
is to use the particle effects (point
sprites), but you'll also be aware that
your limited to the number that can be
rendered - a decent explosion would
require 1000's if not millions of these
particles - very slow using these
methods. So how do they do it, if
they're not using raw geometry?
The
answer is very simple, and in truth it's
just a visual trick - after reading this
article, if you go back and play unreal
tournament, Deus Ex, Half Life (or
whatever takes your fancy) you may be
able to catch them at it. The explosion
itself is just a clever use of
animation, textures and a little bit of
geometry; one of the artists has used a
program to render an explosion onto a
series of textures, and the programmer
uses these textures, a few triangles and
some alpha blending to put it in the
game engine. The original explosion
textures could take 3 days to render for
all we care - once they're rendered we
can use them in our game just the same
as any other texture.
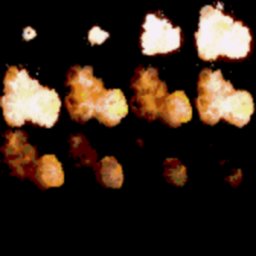
(Thanks
to Xtreme Game LLC)

Above
is an example of the animations I'm
talking about, you can see that straight
away it would be very very difficult to
replicate something like that
on-the-fly, and doing it fast would be
even harder! The visual trick behind all
of this is called billboarding. In our
3D world we orientate 2 triangles in the
form of a square so that they exactly
face the camera; this means that they
appear with the correct aspect ratio and
perspective, yet they can still be
scaled and occluded by other aspects of
our 3D world (distance for example).
2.
The maths behind it all
The
maths involved is simply down to working out the
correct angle that we want to rotate the billboard
by, in some worlds this can be extremely simple
- just around the Y axis, whereas others will
need to be rotated around all 3 axis; on the other
hand, you may well not want them rotated around
a particular axis because it'll look wrong - take
a tree for example, you don't want it to rotate
so that the trunk/roots appear to come out of
the ground...
Before
we get started here credit is due to Eric Coleman
who pretty much wrote all of the proper billboarding
maths and code - thanks to him! You can see what
he's working on here: Gladiator
- Fields Of Slaughter. The following steps
are an adapted version of what Eric explained
to me via email and a sample program...
The
problem: To rotate a simple quad (2 triangles)
so that it faces the camera:
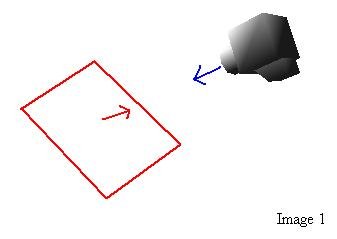
Step
1: Calculate the direction vector:
Maths: vN = -vTo + vFrom
In VB:
vN.X = -vTo.X + vFrom.X
vN.Y = -vTo.Y + vFrom.Y
vN.Z = -vTo.Z + vFrom.Z
|
|
|
|
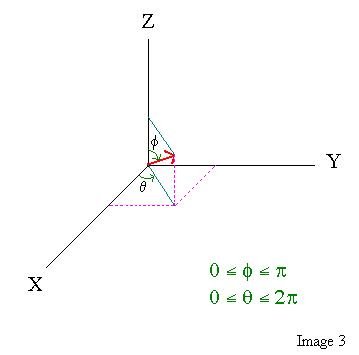
Step
2: Convert To Spherical Coordinates
We now have a direction vector, which if placed
at the origin can be treated as a point in 3D
Space, as shown in the following diagram:
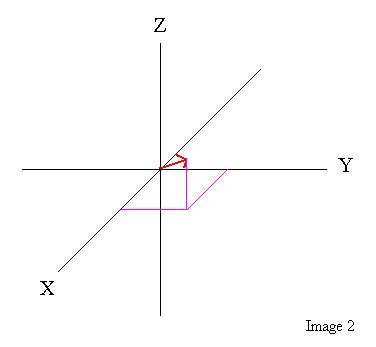
We
want to change this point into spherical coordinates,
which can be done using the following maths:
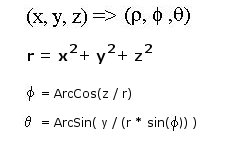
And all this in VB is:
R = Sqr(vN.X * vN.X + vN.Y * vN.Y + vN.Z * vN.Z)
                                                          temp = vN.Z / R
If temp = 1 Then
    BBphi = 0
ElseIf temp = -1 Then
    BBphi = PI
Else
    BBphi = Atn(-temp / Sqr(-temp * temp + 1)) + (PI / 2)
End If
                                                          temp = vN.X / (R * Sin(BBphi))
If temp = 1 Then
    BBtheta = 0
ElseIf temp = -1 Then
    BBtheta = PI
Else
    BBtheta = Atn(-temp / Sqr(Abs(-temp * temp + 1))) + (PI / 2)
End If
                                                          If vN.Y < 0 Then
    BBtheta = -BBtheta
End If
|
|
|
|
This
next image shows the relationship of phi and theta
- the two angles that we just found while converting
to spherical coordinates...
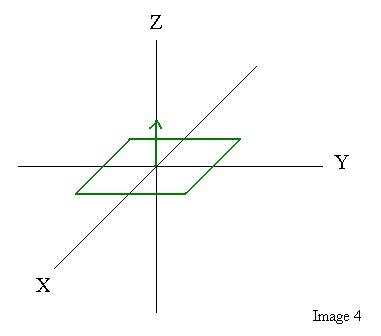
Step
3: Rotating
We now know the angles by which we need to
rotate the billboard, all we need to do is actually
rotate them...
First we start off with the plain geometry; this
must be created in the XY plane - as demonstrated
by the next diagram:
The first step to rotating the billboard is to
rotate it phi radians around the Y axis, in maths
this will look like this:
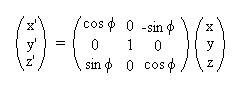
Graphically it looks like this:
and in VB this will be:
x = V.x * cos(phi) - V.z * sin(phi)
z = V.x * sin(phi) + V.z * cos(phi)
V.x = x
V.z = z
|
|
|
|
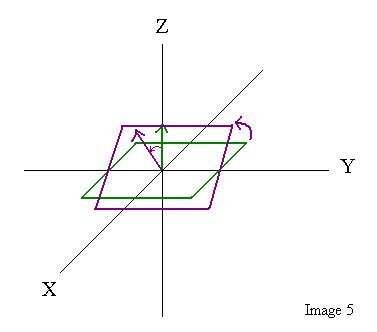
The
next step is to rotate around the Z axis by theta
radians. Graphically this will be:
and mathematically:
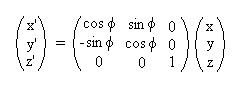
finally, in VB this looks like
x = V.x * cos(theta) + V.y * sin(theta)
y = -V.x * sin(theta) + V.y * cos(theta)
V.x = x
V.y = y
|
|
|
|
The
final step is to translate the billboard back
to it's original coordinates - a simple vector
addition.
Conclusion
Right, above is all you need to know to construct
the relevent rotations for a billboard - but it
isn't the end of the world if you dont completely
understand all the maths behind it - the following
D3D code implementation should be enough for most
people.
3.
Migrating this to Direct3D
Now
that we have the mathematics worked out, we need
to make this work with code...
We're
going to break this into two main sections - cheap
billboards and proper billboards, the former is
a simple method that I came up that doesn't rely
on any maths; the latter is the implementation
of Eric Coleman's maths for rotating the geometry.
Cheap billboards are functional and can be set
up easily in about 2 minutes, but aren't really
useful when you can do proper billboarding - but
I thought I'd leave them in here, should you really
want to use them...
A:
Cheap Billboards
This method uses transformed and lit vertices
- you transform the billboard coordinates into
screen space, then draw a quad (2 triangles in
a square shape) around the coordinate - simple
really. It's effectively the same as the point
sprites demonstrated in
this previous tutorial. Here's the following
code that makes it all work (taken from the sample
application):
Private Sub RenderCheapBillboards(vp As D3DVIEWPORT8)
'######################
'## 0. DECLARATIONS ##
'#####################
    Dim I As Long, X As Long, Y As Long

    Dim v2D(0 To 4) As D3DVECTOR, Verts(0 To 3) As TLVertex
    Dim Ref(0 To 4) As Long 'sort the depths...
    Dim Depths(0 To 4) As Single
    '   - NB: wont respond to camera roll.

    '##########################
    '## 1. SETUP THE DEVICE ##
    '########################

    D3DXMatrixIdentity matWorld
    D3DDevice.SetRenderState D3DRS_ALPHATESTENABLE, 1 'alpha testing is useful... ;)
    D3DDevice.SetRenderState D3DRS_ALPHAFUNC, D3DCMP_GREATEREQUAL 'Pixel passes if (pxAlpha>=ALPHAREF)
    D3DDevice.SetRenderState D3DRS_ALPHAREF, 50 'only if the pixels alpha is greater than
                            'or equal to 50 will it be rendered (skips lots of rendering!)
    D3DDevice.SetRenderState D3DRS_ZWRITEENABLE, 0 'we dont want to affect the depth buffer
    D3DDevice.SetTexture 0, TexExplosion
    D3DDevice.SetVertexShader FVF_TLV

    '######################################
    '## 2. TRANSFORM TO SCREEN SPACE ##
    '####################################
    For I = 0 To 4
        D3DXVec3Project v2D(I), ExpTranslate(I), vp, matProj, matView, matWorld
        Ref(I) = I
        Depths(I) = v2D(I).Z
    Next I

    '#####################
    '## 3. SORT DEPTHS ##
    '###################
        Dim Changes As Long, tmp As Single, lTmp As Long
        Changes = 1 'just to get it started...
        Do While Changes > 0
            Changes = 0
            For I = 0 To 3
                If Depths(I + 1) > Depths(I) Then
                     tmp = Depths(I)
                     Depths(I) = Depths(I + 1)
                     Depths(I + 1) = tmp
                     lTmp = Ref(I)
                     Ref(I) = Ref(I + 1)
                     Ref(I + 1) = lTmp
                     Changes = Changes + 1
                End If
            Next I
        Loop

    '###########################
    '## 4. RENDER THE QUADS ##
    '#########################
    For I = 0 To 4
            '//Generate the vertices.
            Verts(0) = CreateTLV(v2D(Ref(I)).X - 100, v2D(Ref(I)).Y - 100, v2D(Ref(I)).Z, _
                                 _ 1, &HFFFFFF, 0, 0)
            Verts(1) = CreateTLV(v2D(Ref(I)).X + 100, v2D(Ref(I)).Y - 100, v2D(Ref(I)).Z, _
                                 _ 1, &HFFFFFF, 1, 0)
            Verts(2) = CreateTLV(v2D(Ref(I)).X - 100, v2D(Ref(I)).Y + 100, v2D(Ref(I)).Z, _
                                 _ 1, &HFFFFFF, 0, 1)
            Verts(3) = CreateTLV(v2D(Ref(I)).X + 100, v2D(Ref(I)).Y + 100, v2D(Ref(I)).Z, _
                                 _ 1, &HFFFFFF, 1, 1)

            X = ExpFrame(Ref(I)) Mod 4
            Y = ExpFrame(Ref(I)) \ 4

            '//Set up the correct texture coordinates
            Verts(0).T.X = X / 4: Verts(0).T.Y = Y / 4
            Verts(1).T.X = (X + 1) / 4: Verts(1).T.Y = Y / 4
            Verts(2).T.X = X / 4: Verts(2).T.Y = (Y + 1) / 4
            Verts(3).T.X = (X + 1) / 4: Verts(3).T.Y = (Y + 1) / 4

            '//Update the current frame if necessary
            If GetTickCount - ExpLastChange(I) > ExpSpeed(I) Then
                ExpLastChange(I) = GetTickCount
                ExpFrame(I) = ExpFrame(I) + 1
                If ExpFrame(I) > 11 Then ExpFrame(I) = 0
            End If

            '//Finally, render the quad
            D3DDevice.DrawPrimitiveUP D3DPT_TRIANGLESTRIP, 2, Verts(0), Len(Verts(0))
    Next I

    '#############################
    '## 5. CLEAN UP THE DEVICE ##
    '###########################
    D3DDevice.SetRenderState D3DRS_ALPHATESTENABLE, 0
    D3DDevice.SetRenderState D3DRS_ZWRITEENABLE, 1  'we dont want to affect the depth buffer
End Sub
|
|
|
|
right,
that shouldn't look too nasty :)
Basically, we collect the depth values for all
the billboards, as well as the 2D coordinate that
they'll be rendered to. We then sort out the Ref(
) array to point, in order, to the deepest-closest
before rendering them. Why do this? Because we're
alpha blending the sprites - alpha blending is
dependant on the current pixels rendered behind
it - so if you draw them in any order you'll get
some strange artifacts, so we sort them, then
draw the deepest before the shallowest so that
we dont get any artifacts. The only two drawbacks
with this method is that the billboards dont respond
to the roll parameter in the projection matrix
setup (so if the rest of the world rolls over
the billboards wont), also there may well end
up being some depth related issues - whilst they
should be rendered at the correct depth, there
is a slight possibility that they'll get out of
sync towards the end of the depth buffer range
(1.0) - this is a property of Z-Buffers and cant
be worked around.
B:
Proper Billboards
Okay, now onto the more complicated method, the
one that Eric designed, and the one with all the
maths... :)
We're
going to set up two main functions, one to calculate
the required angles - this must be called on every
update of the camera; and another function to
construct the relevent matrix for the billboards
- this must be called for every billboard. Finally
there is a sub routine that uses the results of
these two master functions to render the final
product.
First
up, the function for calculating the angles, some
of the code here may look familiar:
Public Sub FindAngles(vFrom As D3DVECTOR, vTo As D3DVECTOR)
'//Finds the angles required to set up the correct
'//billboard rotations. Written by Eric Coleman (thanks!)
Dim vN As D3DVECTOR
Dim R As Single, temp As Single '//1. Calc. Vector from Cam->BBoard
vN.X = -vTo.X + vFrom.X
vN.Y = -vTo.Y + vFrom.Y
vN.Z = -vTo.Z + vFrom.Z
'//2. Convert to spherical Coords
R = Sqr(vN.X * vN.X + vN.Y * vN.Y + vN.Z * vN.Z)
temp = vN.Z / R
If temp = 1 Then
BBphi = 0
ElseIf temp = -1 Then
BBphi = PI
Else
BBphi = Atn(-temp / Sqr(-temp * temp + 1)) + (PI / 2)
End If
temp = vN.X / (R * Sin(BBphi))
If temp = 1 Then
BBtheta = 0
ElseIf temp = -1 Then
BBtheta = PI
Else
BBtheta = Atn(-temp / Sqr(Abs(-temp * temp + 1))) + (PI / 2)
End If
If vN.Y < 0 Then
BBtheta = -BBtheta
End If
End Sub
|
|
|
|
The
next function is the generate matrix function...
Private Sub GenerateBBMatrix(Index As Long)
Dim tempMatrix As D3DMATRIX
Dim tempMatrix2 As D3DMATRIX
D3DXMatrixIdentity
matWorld
D3DXMatrixIdentity
tempMatrix
D3DXMatrixRotationY
tempMatrix, BBphi
D3DXMatrixRotationZ
tempMatrix2, BBtheta
D3DXMatrixMultiply
matWorld, tempMatrix,
tempMatrix2
matWorld.m41
= ExpTranslate(Index).X
matWorld.m42 = ExpTranslate(Index).Y
matWorld.m43 = ExpTranslate(Index).Z
D3DDevice.SetTransform
D3DTS_WORLD, matWorld
End Sub
|
|
|
|
Finally
we have the wrapper sub, the one that controls
everything! This may require some explanation
though. It's divided into 6 nice sections for
you - which makes things nice and easy. The first
and the last section configure the device, the
only important parts here are the alpha testing
and Z-Writing; firstly I've set it up to not render
any pixels with an alpha value of less than 50
(of 255) - the sample code uses alpha maps (as
demonstrated in this previous
tutorial) and alpha testing is an interesting
little feature I thought I may as well include.
Secondly there is the Z writing, which I disable
at the start of the sub and enable again at the
end - the billboards aren't really 'there' in
this case, so I dont want them to affect other
geometry (if Z writing was enabled anything behind
them would not get rendered if the billboard has
already been rendered). Also, we're using a simple
sorting algorithm (bubble sort to be precise)
so that we render the billboards back-front in
world space - this is purely for alpha blending
purposes; if you're not using any form of alpha
blending then you can skip this part. Alpha blending
is draw depth dependent, which is why this is
necessary.
Private Sub RenderProperBillBoards(vp As D3DVIEWPORT8)
Dim I As Long, X As Long, Y As Long
Dim StoredMatrices(0 To 4) As D3DMATRIX '//we need to cache the matrices...
Dim Depth(0 To 4) As Single, vTmp As D3DVECTOR
Dim Ref(0 To 4) As Long 'pointer to correct value...
'#########################
'## 1: SETUP THE DEVICE ##
'########################
D3DDevice.SetVertexShader FVF_LV
D3DDevice.SetTexture 0, TexExplosion
D3DDevice.SetRenderState D3DRS_ALPHATESTENABLE, 1 'alpha testing is useful... ;)
D3DDevice.SetRenderState D3DRS_ALPHAFUNC, D3DCMP_GREATEREQUAL 'Pixel passes if (pxAlpha>=ALPHAREF)
D3DDevice.SetRenderState D3DRS_ALPHAREF, 50
D3DDevice.SetRenderState D3DRS_ZWRITEENABLE, 0 'we dont want to affect the depth buffer '####################################
'## 2: CALCULATE NECESSARY DATA ##
'###################################
For I = 0 To 4
X = ExpFrame(I) Mod 4
Y = ExpFrame(I) \ 4
'//Set up the correct texture coordinates
Exp(I).V(0).T.X = X / 4: Exp(I).V(0).T.Y = Y / 4
Exp(I).V(1).T.X = (X + 1) / 4: Exp(I).V(1).T.Y = Y / 4
Exp(I).V(2).T.X = X / 4: Exp(I).V(2).T.Y = (Y + 1) / 4
Exp(I).V(3).T.X = (X + 1) / 4: Exp(I).V(3).T.Y = (Y + 1) / 4
'//Update the current frame if necessary...
If GetTickCount - ExpLastChange(I) > ExpSpeed(I) Then
ExpLastChange(I) = GetTickCount
ExpFrame(I) = ExpFrame(I) + 1
If ExpFrame(I) > 11 Then ExpFrame(I) = 0
End If
'//Calculate the correct rotation/translation matrix for the geometry
GenerateBBMatrix I
StoredMatrices(I) = matWorld 'cache this matrix for usage later on.
NB: it is the currently set matrix though...
Next I
'##########################################
'## 3: GATHER PROJECTED DEPTH VALUES ##
'########################################
For I = 0 To 4
D3DXVec3Project vTmp, ExpTranslate(I), vp, matProj, matView, matWorld
Ref(I) = I
Depth(I) = vTmp.Z 'all we want is the Depth-Buffer value.
Next I
'###########################
'## 4: SORT DEPTH VALUES ##
'##########################
Dim Changes As Long, tmp As Single, lTmp As Long
Changes = 1 'just to get it started...
Do While Changes > 0
Changes = 0
For I = 0 To 3
If Depth(I + 1) > Depth(I) Then
tmp = Depth(I)
Depth(I) = Depth(I + 1)
Depth(I + 1) = tmp
lTmp = Ref(I)
Ref(I) = Ref(I + 1)
Ref(I + 1) = lTmp
Changes = Changes + 1
End If
Next I
Loop
'#############################################
'## 5: RENDER DEEPEST FIRST-CLOSEST LAST ##
'############################################
For I = 0 To 4
D3DDevice.SetTransform D3DTS_WORLD, StoredMatrices(Ref(I))
D3DDevice.DrawPrimitiveUP D3DPT_TRIANGLESTRIP, 2, Exp(Ref(I)).V(0), Len(Exp(Ref(I)).V(0))
Next I
'###########################
'## 6: TIDY UP THE DEVICE ##
'#########################
D3DDevice.SetRenderState D3DRS_ALPHATESTENABLE, 0
D3DDevice.SetRenderState D3DRS_ZWRITEENABLE, 1
End Sub
|
|
|
|
Well,
there we have it - another tutorial down. Hopefully
you'll find this technique useful in the future...
go play some of the top 3D action games and I'm
pretty sure you'll notice some nice billboard-based
special effects in action...
I
strongly suggest that you download the complete
source code for this tutorial. After that, you
can move onto the next tutorial - Lesson
16 : Visibility Testing and Culling to increase
speed
|