|
Introduction
To Lighting
Author
:
Jack Hoxley
Written : 20th December 2000
Contact : [Web]
[Email]
Download : Graph_07.Zip
[42 Kb]
Contents
of this lesson:
1. Introduction
2. Lighting Theory
3. Generating a normal
4. The Geometry
5. Setting up Lights
6. Ambient Lights
7. Directional Lights
8. Point Lights
9. Spot Lights
1.
Introduction
Lighting
is my favourite part of designing a game. Once you've added light to a game
it adds a whole new layer to the experience - especially if you do it correctly.
Up to this point you've specified the colour of your vertices - which could
allow you to make your own lighting engine (I do have a tutorial on this in
the "General Game programming" section). As an example, go and play
your favourite full-3D game (Something like Quake, Deus Ex, Half Life and so
on are good ones) - and just spend a couple of minutes examining the lighting
used. Then try and imagine what it would be like without the lighting there
- where everything was the same brightness and there were no shadows. As mentioned
above, Deus Ex is an excellent example of lighting (and an excellent game full
stop), there are many parts of this game where you're in dark areas - with glaring
spot lights and street lights being your only illumination; and a lot of the
combat that you take part in will see you hiding in the shadows - a prime example
of how lighting can affect the way you play the game.
Having
illustrated the way lighting can be used to create atmosphere I'd also like
to point out how lighting can also destroy the atmosphere - when used incorrectly.
Like a lot of things when developing a game, lighting can be seen as an art
- put them in the wrong places, in the wrong combination or at the wrong time
and you'll get a mess; coloured lights may look really pretty, but 100 of them
spinning round and round will look pretty silly very quickly.
In
order to implement lighting in your scene you'll need to understand just what
it is - and how you use it; which calls for some theory work...
2.
Lighting Theory
What
is Direct3D Lighting?
Direct3D
Lighting is an approximation of how a light works in the real world. It is unlikely
that you'll get a computer that exactly replicates real world lighting in a
game for a good 5 years yet (500Ghz chips?). Hopefully you'll know how light
works - It always travels in straight lines, and fades out over distance (and
it goes very fast as well). Up to this point you'll have seen 3D geometry where
you specify the colour, and Direct3D blends the colour across a triangle. That
colour is light. The Direct3D lighting engine replaces your ability to set the
vertex colour by calculating the colour itself (based on what lights are available);
then as normal Direct3D will blend the colours across the triangle.
What
types of light are available?
There
are 4 main types of light that you can use; but several features allow you to
design your own lights (Pixel Shaders, and Lit vertices that you've already
seen). These lights are explained below:
Point Light: A point light is represented by a point in 3D space with
various light emiting properties - range, colour and attenuation. A point light
radiates light in all directions from itself - like a lightbulb, candle, star
(a very small one).
Spot Lights: A spot light has a position and a direction - it shines
light in this direction with characteristics similiar to that of a spot light
or a torch. You have to specify the cone angles, and range.
Directional Lights: These have no position, instead they light all vertices
as though light were coming from an angle. Directional lights are best used
for mimicking extremely large lights from a long distance - the sun for example.
Ambient Light: When you set up ambient lighting all vertices are garaunteed
to be no darker than this colour. This is what is used when games make their
scenes mid-afternoon or late-night for example - without using 100's of lights
to bring up the overall light we just define the darkest colour. It should be
farely logical that there's no point in having other lights in a scene if the
ambient lighting is full white...
Practicalities
of Lighting
Whilst
most rendering devices dont have a maximum number of lights in a scene, it should
be fairly obvious that the more lights you have the more calculations Direct3D
does, the slower your scene is rendered. Having said that, most of the hardware
transform and lighting cards have a maximum number of lights - 8 for the GeForce
256 and 16 for the GeForce 2; so for full compatability either check the upper
limit or try to keep the number of lights below 8.
You should also be aware that different lights take different amounts of time
to process; in general the quickest type is ambient lighting, followed by directional
lights, then point lights and slowest of all are spotlights.
Range Matters as well - if you're light covers a huge area it's going
to influence a large number of vertices - each of these vertices adds a little
extra time to the calculations. The general rule, therefore, is to keep the
range only to the size that you need it.
Specular Lighting is a nice little feature that we'll come across later
in the series, it allows you to make shiny objects - diamonds and crystals for
example. The reason I bring this up now is that specular lights require double
the processing time - so when you do use them, use them sparingly.
Geometry Detail is also important; as already mentioned, lighting is
calculated on a per-vertex scale - the more vertices, the longer it takes to
process the lighting. Whilst there isn't really any way of getting around this,
you may well want to bare it in mind when designing levels - less lights in
complex areas. Also, basic logic really, but there's no point having an active
light somewhere the player will never go/be - you're just wasting valuable processing
time.
Shadows dont naturally
occur - they are quite a complicated and advanced topic. As you know, light
travels in a straight line, therefore when it hits a solid (or opaque) object
it wont carry on - anything behind this will not recieve light from the current
source. Calculating if every ray casted goes through any of the triangles in
the scene takes a massive amount of processing power - so Direct3D doesn't do
it. It scales light colour based on the orientation of the triangle, so the
back side of an object (which faces away from the light) will not recieve any
light - but dont be fooled; there are no shadows.
Words
and terminology you should know
There are a few terms that you'll need to understand before setting up your
own lights. None of them are complicated though:
Range: How far the light goes; any vertices with a distance greater than
this will not be lit by the light. If you can keep the range of the light down
so much the better.
Attenuation: This is how the light changes over distance - how it fades
out usually. It is possible to make some weird results with this one - light
that gets brighter towards the edge and so on.
Light Direction: This is a normalised vector that describes what direction
it's pointing in - a normalised vector is a vector with a length of 1. Hopefully
you have a basic knowledge of how vectors work; whilst you can use them to specify
a position, they are by default a direction/distance relative to the origin.
For example, [0,8,0] will have a length of 8 (8 units from the origin) and will
cause something to look in the +Y direction.
Position: Fairly obvious this one - but it's often something that many
people get funny results with. Direct3D shades a vertex based on it's normal
(see next item); if you have a grid of vertices in a floor like setup, and if
the light is positioned very close to the floor it'll appear to have a very
small area of influence - regardless of it's range and attenuation. The is basic
maths really - if it shades a vertex based on it's normal (a direction) then
if the angle between the light and the normal is very small (which would happen
in this instance) it'll recieve very little light.
Normal: This is a very important thing to remember, and I'll show you
how to generate a normal a little later on. For an example, take a triangle
- one that's spinning around in 3D space; how do you know what direction it's
facing? the human eye could probably tell you - but this is useless to the Direct3D
lighting engine - it needs numbers. A normal also tells direct3D which way the
triangle is NOT facing - so if the light is behind the triangle the triangle
will recieve no light. A normal must also have a length of 1 - which isn't a
great problem as there are several features around that will scale the vector
to a length of 1 for you.
3.
Generating a normal
Before
we go into any greater detail you'll need to know how to generate a normal for
your triangle. Once you've learnt this it isn't particularly difficult - but
if you do get it wrong it can lead to some weird and frustrating results. To
generate a normal you need to follow these steps:
1.
Make sure the triangle is generated in a clockwise order  for example
2. Create a vector from vertex 0 to vertex 1
3. Create a vector from vertex 0 to vertex 2
4. Get the Cross product of the two vectors we just created
5. Normalise the cross product - not entirely necessary, but garauntees there
are no errors.
We'll
now put this to use by writing a simple function for calculating the normal.
Before this you should be aware that the above code generates a normal for the
whole triangle - which is okay if that's what you want (just copy the generated
normal to all 3 vertices); but if more than one triangle shares the same vertex
you may well want a normal that represents both faces. This can easily be done
by adding the two generated vertices together; as shown in the following diagram:
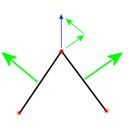
In
the preceeding diagram we see two faces (in 2D) represented by black lines;
the big green arrows represent the normal. At the joining vertex you can imagine
a *fight* over which normal it uses - if it uses either of them the other face
will look odd. So if we try adding the two vectors together - as shown by the
2 small green arrows at the top; we get to the point shown by the blue arrow;
an average vector that doesn't really represent either face, but it's not biased
to any one side in particular. We'll need to re-normalise the new vector, as
it'll probably have a lengh of 2 (2 1 unit vectors added together). The final
thing to mention on this is that you'll end up with slightly blurry lighting
using this method - because Direct3D blends the colours across the vertices
you'll find that you cant get a sharp difference between either triangle - which
would be useful if they were the corners of two walls.
The
code for generating a normal goes like this:
Private Function GenerateTriangleNormals(p0 As UnlitVertex, p1 As UnlitVertex, p2 As UnlitVertex) As D3DVECTOR
'//0. Variables required
    Dim v01 As D3DVECTOR 'Vector from points 0 to 1
    Dim v02 As D3DVECTOR 'Vector from points 0 to 2
    Dim vNorm As D3DVECTOR 'The final vector
'//1. Create the vectors from points 0 to 1 and 0 to 2
    D3DXVec3Subtract v01, MakeVector(p1.X, p1.Y, p1.Z), MakeVector(p0.X, p0.Y, p0.Z)
    D3DXVec3Subtract v02, MakeVector(p2.X, p2.Y, p2.Z), MakeVector(p0.X, p0.Y, p0.Z)
'//2. Get the cross product
    D3DXVec3Cross vNorm, v01, v02
'//3. Normalize this vector
    D3DXVec3Normalize vNorm, vNorm
'//4. Return the value
    GenerateTriangleNormals.X = vNorm.X
    GenerateTriangleNormals.Y = vNorm.Y
    GenerateTriangleNormals.Z = vNorm.Z
End Function
|
|
|
|
Not
greatly complicated really, we can pass 3 vertices defining a triangle to this
function and it'll return the normal for it - you then need to copy the normal
to all 3 vertices. It's a good idea to remember this code, or at least how to
write your own (I remember it as "Normalised Cross Product of the vectors
from 0 to 1 and 0 to 2"). You could adapt this code slightly so that it
fills the 3 passed vertices with the normal information, but I decided against
this so that I left room for adding normals together (as explained above).
4.
The Geometry
This
shouldn't take very long - hopefully you're already aware of how geometry works
- so this is just a review of what has changed in order for lighting to work.
The
first thing to change is the vertex format - we have a new type to play with
this time. The only real change is the loss of a color variable (we cant set
the colour) and the addition of values to hold data about the vertex normal.
Private
Type
UnlitVertex
X As
Single
Y As
Single
Z As
Single
nx As
Single
ny As
Single
nz As
Single
tu As
Single
tv As
Single
End
Type
Const
Unlit_FVF
=
(D3DFVF_XYZ
Or
D3DFVF_NORMAL
Or
D3DFVF_TEX1) |
|
|
|
Not
too difficult really.
Next,
the way we create the geometry has changed slightly. I've used the 3D cube that
we generated in an earlier lesson as a basis, but altered it so that all the
triangles are in the correct order (not all of them were CW in the other lesson);
and I've added code to generate the normals.
Cube2(0)
=
CreateVertex(-1,
-1, 1,
0, 0,
0, 0,
0)
Cube2(1)
=
CreateVertex(1,
1, 1,
0, 0,
0, 1,
1)
Cube2(2)
=
CreateVertex(-1,
1, 1,
0, 0,
0, 0,
1)
vN =
GenerateTriangleNormals(Cube2(0),
Cube2(1),
Cube2(2))
Cube2(0).nx
= vN.X:
Cube2(0).ny
= vN.Y:
Cube2(0).nz
= vN.Z
Cube2(1).nx
= vN.X:
Cube2(1).ny
= vN.Y:
Cube2(1).nz
= vN.Z
Cube2(2).nx
= vN.X:
Cube2(2).ny
= vN.Y:
Cube2(2).nz
= vN.Z |
|
|
|
That's
only one triangle out of the 12 that make up the cube, but they're all pretty
much the same. Note that in the initial creation I haven't specified a normal
- it's left as [0,0,0] - we then calculate the normal and overwrite the old
value with the new one. The "CreateVertex" function is a simple wrapper
similar to ones we've used in previous lessons - it just saves us from having
8 lines of code to create each vertex.
5.
Setting up lights
There
are a couple of things that you must do in order to get a light working in your
scene; most of them can be done at the beginning and left alone for the remaining
runtime.
First
you must apply a material to the device - if you forget to do this everything
will appear black (this is the cause of many "newbie" problems).
Dim
Mtrl
As
D3DMATERIAL8,
Col As
D3DCOLORVALUE
Col.a
= 1:
Col.r
= 1:
Col.g
= 1:
Col.b
= 1
Mtrl.Ambient
= Col
Mtrl.diffuse
= Col
D3DDevice.SetMaterial
Mtrl |
|
|
|
You
can change the values of the "Col" value if you want to alter the
global lighting. At the moment it's set to white - it wont interfere with anything
in the scene; if you set it to a slight tint of blue all subsequent lights would
appear slightly blue...
Secondly
you must let the device know about your light:
| D3DDevice.SetLight 0, Lights(0) '//Replace Lights(0) with any valid D3DLight8 object |
|
|
|
Once
this line is called you can use the light, but if you change the property in
the D3DLight8 object you'll need to call this function again. The first argument
is the index, being a long datatype means that theoretically you could
have around 2 billion lights created - but it's unlikely to be needed.
Thirdly
you need to turn the light on; in the theory section above I mentioned about
keeping the number of lights down; well this is where it applies. You can register
as many lights as you like with the device, but you need to keep a lid on how
many of them are active. These values can be turned on and off as you please
- enabling certain lights for certain parts of geometry is another way of keeping
the processing overheads down...
| D3DDevice.LightEnable 0, 1 '1 = On 0 = Off |
|
|
|
Lastly
you need to tell Direct3D that you want it to do lighting for you - up till
this point we've told it to disable the lighting engine; so here's how to enable
it:
| D3DDevice.SetRenderState D3DRS_LIGHTING, 1 |
|
|
|
Nothing
greatly challenging in here.... Onto learning how to set up each type of light.
6.
Ambient Lighting
This
isn't a particularly complicated thing - one line of code is all it takes. Whilst
a light can have an ambient property if it does Direct3D will just add them
all together - for example, we could have 3 ambient values - red, green and
blue, Direct3D would just add them together as being White....
you
set the ambient light through a SetRenderState call, the ambient colour is a
hexidecimal RRGGBB colour (as opposed to a AARRGGBB code).
| D3DDevice.SetRenderState
D3DRS_AMBIENT,
&H202020 'This
specifies
a dark
grey
colour |
|
|
|
7.
Directional Lights
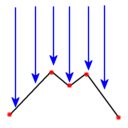
An
example of a directional light
These
are best, after ambient lights, for lifting the overall lighting level of a
scene. You can use these if you want to simulate the sun for example, and if
you get it to change directions over time it'll appear to shade things like
the sun would (only one side of a cube for example).
A
directional light has direction and colour but no position, no attenuation and
no range. The direction specified is normally a normalised vector (we've done
these, remember?) but it doesn't have to be - as long as it isn't [0,0,0] then
it's okay. Here's how we set up our Directional light:
Lights(0).Type
=
D3DLIGHT_DIRECTIONAL
Lights(0).diffuse.r
= 1
Lights(0).diffuse.g
= 1
Lights(0).diffuse.b
= 1
Lights(0).Direction
=
MakeVector(0,
-1, 0) |
|
|
|
As
you can tell, our light is pointing straight down and is white; you can mix
and match the direction vector with anything you like - so long as it has length.
8.
Point Lights
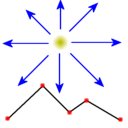
An
example of a point light
Point
lights are one of the easiest to set up; give them a position, colour, range
and attenuation and that's it (note that they dont have direction). Here's how
we set up a point light:
Lights(1).Type
=
D3DLIGHT_POINT
Lights(1).position
=
MakeVector(5,
0, 2)
Lights(1).diffuse.b
= 1
Lights(1).Range
= 100
Lights(1).Attenuation1
= 0.05 'Set the Linear Attenuation to 0.05 |
|
|
|
Here
we have created a blue point light. The range is quite short - so that you can
see the basics of the attenuation factors coming in. You'll note that there
are 3 attenuation variables - Attenuation0, Attenuation1 and Attenuation2 -
these are the Constant, Linear and Quadratic values respectively. Play around
with these values to get different effects - but remember, attenuation won't
be very easy to notice if the light has a range of 100000 (or some-other suitably
large number).
9.
Spot lights
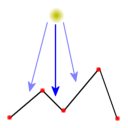
An
example of a spot light
Spotlights
are very clever, yet they are quite difficult to set up (compared with the other
types) and they have quite a high processing overhead. As you should just about
be able to see on the diagram above the outside of the cone is lighter than
the inside of the cone. The following diagram illustrates this further:
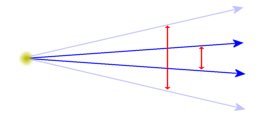
You
should also note that there are two radii for the cone - an inner (Theta) and
outer (Phi); you can specify both of these. Note that they are both measured
in radians, not degrees - to convert from degrees to radians multiply degrees
by (Pi / 180).
The
following code is used by the example program to generate a spot light:
Lights(2).Type
=
D3DLIGHT_SPOT
Lights(2).position
=
MakeVector(-4,
0, 0)
Lights(2).Range
= 100
Lights(2).Direction
=
MakeVector(1,
0, 0) 'Along the X axis
Lights(2).Theta
= 30 *
(Pi /
180) 'Inner Cone
Lights(2).Phi
= 50 *
(Pi /
180) 'Outer Cone
Lights(2).diffuse.g
= 1
Lights(2).Attenuation1
= 0.05 |
|
|
|
Not
greatly complicated really; just remember that that the cone's inner and outer
angles are specified in radians not degrees.
There,
our tour of basic lighting is complete - there's nothing greatly complicated
about the last part, but you have to remember the first part about generating
normals; get that wrong and you'll get some very strange results. You can download
the source code (I suggest you do) from the top of the page.
Assuming
you've followed all of that, onto Lesson 08 : Advanced
Geometry part 1 - Loading pre-created 3D objects
|

