|
Loading
Pre-Created Objects
Author
:
Jack Hoxley
Written : 22nd December 2000
Contact : [Web]
[Email]
Download : Graph_08.Zip
[209 Kb]
Contents
of this lesson:
1. Introduction
2. Making 3D Objects
3. Loading a pre-created object
4. Rendering our object
1.
Introduction
Up
till this point we've been manually generating any geometry that we need - squares
and cubes mostly. You may or may not have given any thought to how commercial
/ proper games work when generating animation and complex 3D models. It doesn't
take a genius to realise that these models are not hard-coded into the game
- doing that would require 1000's of lines for each frame of an animation -
not a very clever way of doing things.
Instead
we load objects in that have been created in another program, usually by a 3D
artist. We read the file, load any relevent textures and materials and hold
it in memory - until we want to render it. There is another advantage as well
- you can edit the file after the final compilation of the executable. If you
decide that you want to lower the triangle count a bit you can open up the file,
play around with it and then save it - and the effects will be mirrored in the
game the next time you play it. You can also have different versions of a model
- low detail, normal detail and high detail - so you can allow the user to play
the game on a low end computer, but if they have performance hardware they'll
be able to get something a little bit more special...
From now onwards we'll be using externally created objects rather than generating
our own hard-coded geometry. Read the next section on how to create your own
geometry.
2.
Making 3D Objects
The
first thing to remember is that you'll need a basic knowledge of how 3D models
work - if you've read all the previous lessons then you should have a reasonable
idea; but if you still dont get it I suggest you go looking around the internet
for some basic 3D-modelling tutorials (It's too bigger a topic to cover here).
Secondly
you're going to need some software. There are hundreds of cheap / free 3D modellers
around, but if you're serious about making good models you'd be wise to look
into one of the more professional packages (such as 3D Studio Max or Lightwave).
Or, if you have no 3D-modelling skills you could go looking for an artist who's
good at 3D work - and hope he/she has the relevent software.
Thirdly
you'll be needing a convertor. Direct3D uses it's own format ".X"
files - there is a convertor included in the SDK for converting ".3DS"
files to ".X" files, but you'll need to get it from the microsoft
site (I do believe it would infringe on the EULA agreement if I uploaded it
here...).
Whilst
there are many other things to bare in mind, the last important one for the
programmer is the model complexity. Depending on how your engine is designed
you'll need to impose some realistic limits on the models that can be used.
For example, if you're aiming for a middle-range specification (Low end 3D card
and reasonable processor) you'll probably be wanting to keep the triangle count
in each scene to around 3000 (give or take a litte); and if your game has a
landscape in it that takes up 1500 of those triangles you have to find a way
of fitting all your players and/or world objects into the remaining 1500 triangles...
3.
Loading a pre-created object
Thankfullly,
the very basics of loading an object into Direct3D is quite simple; it's only
when you get onto animation and skinning it gets complicated. As mentioned above
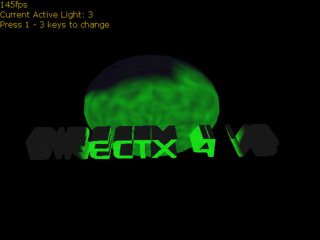
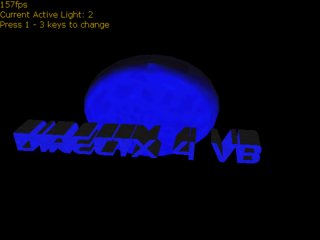
we need an object, which I've done - and you can see in the sample file. All
it is is a sphere with "DirectX 4 VB" rotating around and around...
I made it in 3DSMax 2, then used the SDK convertor (Conv3ds.exe) to convert
it into an X-File. If you have this utility you should use this command line:
"Conv3DS -m -V2 file.3ds", the "-V2" part is optional, but
it provides you with some basic information, you can add other parameters, but
you must remember to keep the "-m" in there.
So
now we have an object to play around with. I'm going to rewrite a part of the
"Lesson 07 : An introduction to Lighting" to use objects - partly
because the lighting is already setup in there; it's also much easier to see
the affect of lighting in this example than in the proper example (because of
the more complex geometry). Here's the new code to go in the declarations section,
note that we no longer have to play around with custom vertex formats (or vertices
full stop.).
'###########
'##
MESH
##
'##########
Dim Mesh As D3DXMesh
'##############################
'## TEXTURES AND MATERIALS ##
'##############################
Dim MeshMaterials() As D3DMATERIAL8 ' Mesh Material data
Dim MeshTextures() As Direct3DTexture8 ' Mesh Textures
Dim nMaterials As Long 'How may materials/textures we have.... |
|
|
|
The
"Mesh" object is what we're going to use to hold all our information,
we'll be using the D3DX library to help us as well (note the "D3DX"
prefix to the variable name). Then there are the materials and textures - both
open ended arrays; After we've loaded the object into memory we'll query it
as to how many textures and materials there are and resize these arrays accordingly.
The
next part is a complete re-write of the "InitGeometry( )" routine,
everything except the error handler has been changed in this procedure - so
here goes:
Private
Function
InitialiseGeometry()
As
Boolean
On
Error
GoTo
BailOut: '//Setup our Error handler
'//0. Any variables required
Dim
mtrlBuffer
As
D3DXBuffer '//Holds some useful data for us...
Dim I
As
Long 'Loop variable
Dim
TextureFile
As
String 'the texture required
'//1. Get the data from the file
Set
Mesh =
D3DX.LoadMeshFromX(App.Path
&
"\lesson08.x",
D3DXMESH_MANAGED,
D3DDevice,
Nothing,
mtrlBuffer,
nMaterials)
If
Mesh
Is
Nothing
Then
GoTo
BailOut: '//Dont continue if the above call did not work
'//2. Allocate the space required for the materials and textures used:
ReDim
MeshMaterials(nMaterials)
As
D3DMATERIAL8
ReDim
MeshTextures(nMaterials)
As
Direct3DTexture8
'//3. Now we fill our arrays with the information required
For I
= 0 To
nMaterials
- 1
'//Get D3DX to copy the data that we loaded from the file into our structure
D3DX.BufferGetMaterial
mtrlBuffer,
I,
MeshMaterials(I)
'//Fill in the missing gaps - the Ambient properties
MeshMaterials(I).Ambient
=
MeshMaterials(I).diffuse
'//get the name of the
texture used for this part of the mesh
TextureFile
=
D3DX.BufferGetTextureName(mtrlBuffer,
I)
'//Now create the texture
If
TextureFile
<>
""
Then 'Dont try to create a texture from an empty string
Set
MeshTextures(I)
=
D3DX.CreateTextureFromFileEx(D3DDevice,
App.Path
&
"\"
&
TextureFile,
128,
128,
D3DX_DEFAULT,
_
0,
D3DFMT_UNKNOWN,
D3DPOOL_MANAGED,
D3DX_FILTER_LINEAR,
_
D3DX_FILTER_LINEAR,
0,
ByVal
0,
ByVal
0)
End If
Next I
'//4. Output some info to the debug window - not required, just interesting
Debug.Print
"Number
of
Faces
in
mesh:
"
&
Mesh.GetNumFaces
Debug.Print
"Number
of
Vertices
in
mesh:
"
&
Mesh.GetNumVertices
InitialiseGeometry
= True
Exit
Function
BailOut:
Debug.Print
"Error
occured
in
InitGeometry()
Code"
InitialiseGeometry
=
False
End
Function |
|
|
|
It's
all fairly explanatory - and as D3DX does most of the hard work we can sit back
and do very little. The last part of (3) can be changed slightly to suit your
needs - where this example uses CreateTextureFromFileEx( ) you could either
rework it to use different sizes, transparencies and so on, or you could replace
it with the old CreateTextureFromFile( ) method - if you really dont know much
about the texture, or just plain dont care.
At
this point in time we have a valid object in memory - something we can now play
with.
4.
Rendering our object
Rendering
our object isn't greatly difficult either. Although you still need to manage
any matrices and transformations that you want. An interesting thing to note
is how the lighting affects the frame rate; as mentioned in the previous lesson,
different lights have different costs - this was quite difficult to see when
we were using such a small geometry set (8 vertices), but as we're now using
100's you'll notice the difference much more. For example, on my computer I
get 170fps for Directional Lights, 160fps for point lights and 145fps for spot
lights - a definate trend downwards there.
As
you've already noticed (I hope) we've loaded our object as parts - we have a
number of materials and textures, whilst you haven't seen it yet, the mesh is
divided into a certain number of parts (1 for each texture/material combination).
As we're going to render these in a loop it is perfectly possible to apply different
transformations to each section - if you know which section is which (trial
and error really - or you could write a configuration file format). Essentially,
therefore, you could have every object in your game in one massive file - as
long as you knew which order they came in - but this makes for difficult editing
later on.
For
I = 0
To
nMaterials
- 1
'//Setup the renderer for this part of the mesh
D3DDevice.SetMaterial
MeshMaterials(I)
D3DDevice.SetTexture
0,
MeshTextures(I)
'//Draw the current part of the mesh
Mesh.DrawSubset
I
Next I |
|
|
|
Not
greatly complicated really - just remember that this part must go between a
Device.BeginScene and Device.EndScene call. Hopefully you should
see something like this:

With the Green SpotLight

With the Blue point light
With the top-down white directional light
You
can download the source code for this lesson from the top of the page, which
i suggest you do...
After
you've got that all sorted, onto Lesson 09 : Advanced
Geometry Part 2 - Using Index Buffers to store Geometry
|

