|
TrueSpace
5
Publisher: Caligari
Purchasing: Caligari
Online Shop $395 UK
Distributor £225 (ex. VAT)
Reviewed: 18th June 2002
Introduction
Those
of you who have explored the depths of Direct3D
will by now (or if not, pretty soon) realize that
you can only get so far using built-in object
types. Sooner or later you're going to have to
make your own models/objects in another program.
You can get so-far by downloading free samples off
many websites - but even then you'll still
eventually end up in the same place...
This
is where this review comes in: TrueSpace 5 has
always been one of the cheaper 3D graphics
packages on the market, therefore you aren't
likely to need a new bank-loan just to purchase a
copy. Will this program cover all of the features
and functions that you need as part of a
multimedia team?
The
User Interface
The user interface for TrueSpace has always
been very different to its rivals - where they've
opted for toolbars, menu-bars and control-windows
TrueSpace opted for a more dynamic system of icon
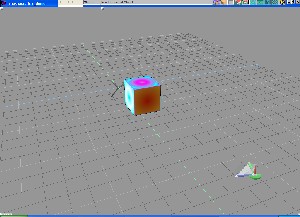
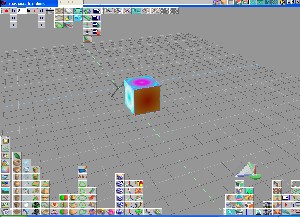
bars. Take a look at these next two screen shots:
Screenshot 01
Screenshot 02
Screenshot 01 shows
TrueSpace in it's most simple view - I've
intentionally hidden all of the icon bars. As you
can see, it gives for a fairly no-nonsense
approach to 3D modeling which make for a change
from other packages. Alternatively, Screenshot
02 shows TrueSpace with all the main icon
bars extended fully - bare in mind that this is
not showing every possible icon - left clicking on
some icons will produce additional menu's - but
it's difficult to show all of these in one
screenshot.
It's
sometimes quite difficult to see - and probably
increasingly difficult if you use a smaller
monitor/resolution - but many of the icons in the
toolbars have red and/or green triangles in the
top left/right corners. Right clicking on these
icons will display a small toolbox related to the
tool(s), left-clicking on these icons will display
an extended menu (similar to those shown in
Screenshot 02).
Using this system makes for a
very quick-start to most projects, you can get
straight into the action without too much hassle.
Once you get familiar with it (it does take
quite a while) you'll learn which toolbars you
need extended/visible at what times. However,
until this point you can find yourself searching
through endless lists of icons wondering if it's
the tool you've been looking for, tooltips/information
is good - but it somewhat lacks the information
you might get by using a traditional menu system
instead.
When
you actually get down to editing an object with a
specific tool you can avoid some of the
frustration of finding icons by the
context-sensitive toolbars that will appear next
to the object once you start editing. These start
off hidden, but hovering the mouse over them will
display a selection of tools specifically for the
current task.
For
those familiar with other 3D rendering packaged,
the interface can be configured to the standard
Front/Top/Left/Perspective style viewport layout.
Indeed, it goes one step further and allows for an
almost unlimited number of different viewport
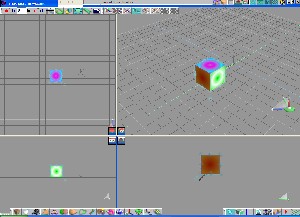
arrangements. Take these next two screenshots for
example:
Screenshot
03
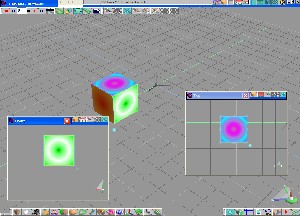
Screenshot
04
In
Screenshot 03, I've set TrueSpace to use a
standard 4-part display, although I've resized it
such that the perspective view (top right) is
larger than the other three (you can drag/scale
these windows as you see fit). In Screenshot 04
I've added two new windows, this is a very
powerful feature in TrueSpace. Most of your work
will probably be done in one view - in my case
usually the perspective view (hence I've left it
as the main window), but it is still useful to pay
cursory glances to other views, and at times
switch to these views to do more precise editing.
Using additional view windows rather than the
traditional 4-part display allows you to make
these windows fairly small and leave them in the
corner (for example) and then use them as
appropriate - without having them as a major part
of the current interface. You are however, limited
to only 4 display windows.
The
final part of the user interface to pay particular
attention to - camera/view movement. As you can
see in Screenshot's 3,4 and 5 there is a small set
of colored arrows/shapes present in the
bottom-right corner of each display window.

This
small control system is a very intuitive method
for manipulating each view in TrueSpace. Hovering
the mouse over one of the arrows/shapes will
highlight it, holding the mouse down and dragging
will proceed to move the view in that particular
direction/rotate it etc... In the main perspective
viewport the Red up-arrow will spin the camera
around it's target, the Green arrow will roll the
camera and the blue arrow will change the pitch.
The larger green shape will do all of these at the
same time (depending on how you move your mouse).
This control is the best way to move the views
around, but it's not the only - you can use one of
the toolbars to individually rotate/move/zoom the
camera - but once you get used to using this
feature you'll probably prefer not to use the
individual tools. The only difficulty comes when
you forget which bar/shape to click on to get the
correct response.
Geometry
Manipulation
TrueSpace
has a fairly complete set of geometry manipulation
tools - simple box modeling (of most use to
realtime multimedia work) through to full NURBS
(Non Uniform Rational B-Splines) surfaces.
NURBS
surfaces have been improved over previous
versions, and are now fairly easy to get to grips
with, making it pretty easy to generate
smooth/organic looking geometry with minimum
hassle. However, NURBS surfaces are still not
incredibly useful when it comes down to exporting
3D geometry for use in realtime applications -
very few modeling formats export the necessary
NURBS data such that Direct3D/OpenGL can fully
make use of it, in the worst cases the formats
triangulate/tessellate the surfaces before
exporting them.
Creating
any of the standard geometrical objects (sphere,
cube, torus etc...) hinges on your use of a new
tool called the "Magic Ring", As shown
in the next three images:
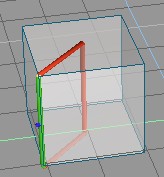
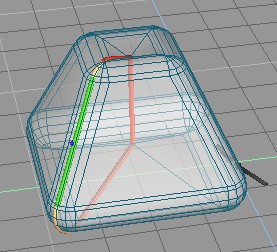
The first picture
shows a simple cube (wireframe with
semi-transparent faces), the magic ring is the
Red/Green square "ring" forming a
cross-section of the cube. By pulling at the
corners/edges of the magic ring you can alter the
parameters from which the cube is created -
creating some very un-cube like objects, as shown
in the second picture. The final picture is after
the geometry is created - a simple solid/shaded
"thing"!
Manipulation
after this point works in a similar way - a
box/square will appear around the selected object
with a set of handles to pull/push. These will
either move the given edge (effectively
scaling/moving vertices) or rotate the edge
(rotating/twisting vertices). A typical example of
this editing method is shown in the following
picture:
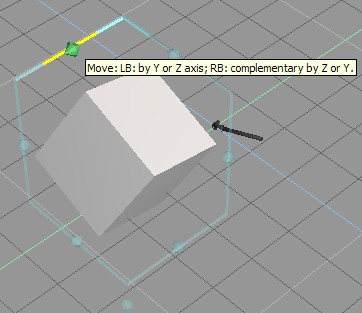
One of the more
important features of any 3D modeler interested in
realtime multimedia work is box modeling (or its
derivatives), using these methods you can usually
guarantee very low polygon counts and have direct
control over the geometry that makes up the final
model. In TrueSpace this follows the pattern set
by the magic-ring and the manipulation boxes. Once
you've created a box you can select a face and
subdivide it (if you need), you can then switch to
face/edge/vertex level, select part of the mesh
and then edit as usual - dragging the vertices
around in world space. This lacks some punch as
found in other products - a few tools for adding
specific triangles/extruding/exploding individual
faces would have been nice, technically these are
still possible just a little more difficult to do.
Textures/Materials
Texturing
and creating materials for meshes is absolutely
key to creating believable meshes/worlds. A
low-quality mesh can be completely transformed by
clever usage of textures and material settings, in
realtime situations this is now especially true
using methods of layered rendering (specular/per-pixel
diffuse lighting for example).
Generating
materials is fairly easy in TrueSpace - upon
opening the material window you can attach
individual colour/specular/bump mapped layers
(amongst others), and even preview it in realtime
using the IIR viewer (very clever that is!).
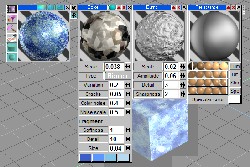
click to enlarge
Shown above is
one of the stock materials, as you can see it's
made up of several different layers (Color, Bump
and Reflectance in this case). You can choose to
hide any of the individual layers by clicking the
gadgets in the windows caption bar. Using the
Area-IIR vewer you can toggle the sliders/make
changes to the material and watch it get updated
in real-time to check your changes (although this
can be a bit slow if you have a complex material).
Texturing is the
only area where the software is really let down in
my opinion, particularly with respect to
box-modeled/realtime model generation. As
previously mentioned - these situations often
require an artist to boost an otherwise simple
model with excellent usage of textures. From a
programmers point of view, it is often useful to
store as many textures for a single mesh on one
"palette" (ie, many 32x64 textures on a
larger 256x256 texture), in which case UV
unwrapping/editing becomes an almost essential
tool. A tool that is missing in TrueSpace.
It is still
possible to do the job - as shown in the first 4
screenshots I managed to make a cube and apply a
different part of the same texture to each face.
This took a lot of time-and-effort, and is no
where near as precise as I'd like (it's only as
accurate as I could see it in the viewport). For
any mesh more complicated than a cube,
particularly game-related characters, this method
of applying textures would be horrendously time
consuming and difficult. The other irritating part
is that once you get it wrong it's not very easy
to undo what you did without getting into a
considerable mess.
The only
consolation comes in the provision of a "UV
Tools" plugin for the program, whilst this
allows you to get much more precise results it
creates considerably more work. Basically, this
plugin will map outlines of all the
faces/triangles onto a 2D texture map (based on
the UV coordinate system) for you to then export
as a file. You can then load this template up into
your favorite paint package (such as the excellent
PaintShop Pro 7)
where you can fill in the areas with the correct
portions of the texture, load it back into
TrueSpace and see the final result. This straight
off creates one annoying error -
stretching/rotating, should you have any obscurely
shaped faces exported in the UV template you'll
need to (in your 2D package)
crop/rotate/manipulate your original texture so it
covers the whole new face. This is quite difficult
to do, and even when done, can cause a noticeable
degradation in texture quality.
It does appear
however, that TrueSpace 6 has/will correct these
issues with a proper UV-space mapping tool.
Rendering
Rendering
is fairly efficient both in time and resources.
Obviously, as your scene gets more complicated and
you employ more special effects the render times
will quickly go through the roof (unless you
happen to have a super computer to hand). Using my
700mhz Athlon I was able to render most sample
scenes (even complex radiosity based ones) in a
matter of minutes. Obviously, try to make an
animation from such a scene and you'll be needing
to leave your system running for several days!
TrueSpace
offers several methods for rendering - you can
render the entire scene, a single object or an
area of the screen. The latter two are of
particular interest as far as time saving goes, it
is particularly irritating if you're working on a
large scene and need to quickly check how some
small alterations look only to have a 5-minute
wait while it renders the whole scene.
Fortunately,
unless you're rendering cut-scenes, backgrounds or
other pre-rendered multimedia material, you
probably won't make huge use of the renderer.
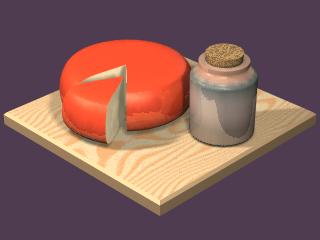
One
of the sample scenes, properly rendered
One
particularly clever piece of technology that has
really made TrueSpace's name is it's inclusion (in
previous versions as well) of radiosity solutions
for lighting. Radiosity is the really complex, but
highly-accurate lighting algorithms now being
employed as a pre-processing step for lighting in
computer games. TrueSpace was one of the first 3D
renderers to add support for this technique as a
standard part of the feature set, and version 5
continues with this. You'll only get any advantage
from Radiosity if you're doing still/movie
rendering - it has absolutely no bearing on
exported models (for use in your own programs),
and unfortunately you can't tap into it's
radiosity engine as a quick-fix solution for your
own lightmapping!
Supporting
Tools
TrueSpace
provides supporting tools in the form of plugins
mostly, of which there are 100's available online
(although only a limited number are free). It
would be impossible to list the many different
forms of plugins available - for any major feature
not included by standard you'll probably be able
to find the plugin somewhere online.
One
particularly useful feature to Direct3D
programmers is the native support for
exporting/importing 'X file' objects (the native
D3D file format for those who don't know).
Traditionally it's been necessary to export
objects to an intermediary format and then run a converter
to generate the final, usable, data. TrueSpace
also supports the very common .3ds format (for 3D
Studio Max), which is definitely useful when
downloading/sharing models over the internet.
The
other important aspect for any program as
complicated as this is help files. The manual can
be found in electronic form as well as a proper
book in the box. Luckily it is very very good -
many key features and techniques are covered in
both a short piece of theory/description and then
a simple step-by-step guide to using/recreating
the effect. The only area where it really lacks is
describing some basic fundamental theory - even
something as simple as a glossary would be nice.
If you're willing to pay for a product like this
you'll probably know what a vertex is, but should
you not (and any other simple terms) there is no
definition except in passing throughout the entire
manual.
Support
online for TrueSpace is generally good, it was
fairly easy to find forums, websites, tutorials
and downloadable samples fairly easily. However,
it pales in comparison to some of the more
industry-standard packages (3DSMax in particular)
which is a shame.
Conclusion
TrueSpace
has it's limitations, particularly in the
texturing tools, but for it's price it's got an
awful lot of features for it's price. The
professional side of 3D modeling/rendering is very
specialized field - thus the software involved is
also very specialized. Because of this it's also
very expensive (Lightwave and 3DSMax ask up to
$5000 a unit), TrueSpace is an exception - at $395
(~£265) a piece it's an absolute bargain.
I
strongly suggest that you download
the 14 day trial of this software before
purchasing it - pay particular attention to the
interface. As I discussed before, the interface is
very intuitive and very clever IF you get used to
it.
Purchasing:
from Caligari
Directly, UK Distibutor (GuildSoft)
| Good
Points |
Bad
Points |
| •
Original Interface |
•
Poor support for precision texture mapping |
| •
Fast and intuitive interface once you get
used to it |
•
Interface may not be for everyone |
| •
Customizable viewports / view window
arrangements |
•
Sometimes a bit difficult to use the
Magic-Ring / Manipulation techniques
properly. |
| •
Clever geometry creation methods (the
Magic-Ring) |
•
Online support and communities are more
focused on rival software. |
| •
For all its weaknesses, very good
feature:price ratio |
|
| •
Trial Version Available for download |
|
| •
Many of the features you'd expect from a
more expensive package. |
|
|

