|
Geometry
manipulation
The
ability to manipulate the geometry you can create
in Max 5 is one of it's strongest points, and one
of the reasons why it has legions of loyal
supporters in the real-time 3D graphics industry.
Max 5 has all the standard tools and more - given
the strong library of basic geometry objects
(cube, sphere, cylinder etc...) there is almost
nothing that you can't create using them. The real
star, for me at least, is their ease of use - most
other 3D modelers will offer similar tools, or at
least a way to achieve the same effect, but very
few are as easy and intuitive to use.
For
real-time low-polygon modeling, it is essential to
have control over every face, edge and vertex -
and be able to use the tools on these geometry
building blocks. One example where this is the
case is with box-modeling, a method typically used
to make low-poly objects: vehicles, buildings,
characters etc...
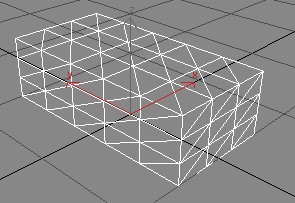
the basic cube mesh to start with
Vertex-level editing to create a tail-fin
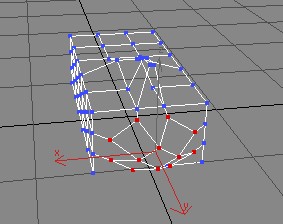
Extrude and Chamfer to create an exhaust
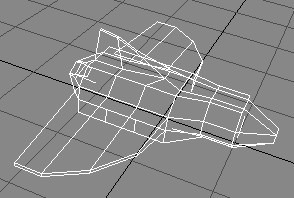
The final low-poly mesh: 120 vertices / 236 faces.
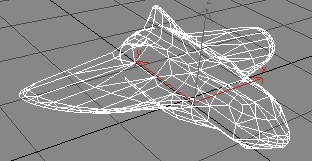
A smoothed version: 671 vertices / 966 faces
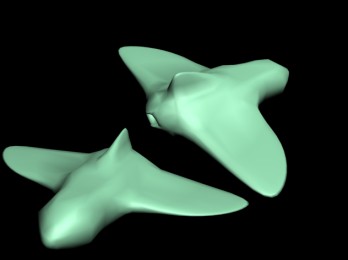
The final mesh rendered. All it needs is some
texturing and
it would be ready to go...
The above example, box modeling to
make a space ship took only a matter of minutes
(around 17 to be precise). The above model is
hardly ground-breaking, and would probably be
laughed at by an experienced modeler (I'm a
programmer most of the time! not an artist!) you
can obviously see the potential it has - a
slightly more thought out mesh and a good use of
textures/materials would make this a perfectly
reasonable model for use in a game environment
(966 faces is a reasonable number).
The key to Max's success in the
past and in this version is it's extremely easy to
use and very powerful 'Modifier Stack'. It is this
method of geometry creation and editing that makes
3ds max 5 so intuitive and powerful. The modifier
stack is literally what it's name implies - a
stack of modifiers. Typically you'll start with a
standard geometry type, then apply an "edit
mesh" modifier so you can refine it's shape,
then maybe add a mesh-smooth modifier like that
shown above. You can then use mesh select, UVW
maps and UVW unwraps to texture each face (or
selection of faces) as you see fit.
|
|
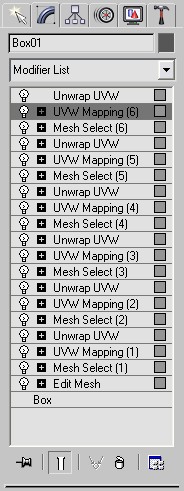
The image
to the left is an example of the modifier stack
involved in texturing a simple cube (bare
in mind this isn't necessarily the best
way of texturing a cube). The list works
from the bottom-up, such that I started
with a simple box object, applied an Edit
Mesh modifier (so I could access each
face/edge/vertex), then went around all 6
faces selecting and texturing them.
Because
of the stack nature, if you edit a
modifier lower down the list you'll
probably alter the modifier(s) that follow
it. Max will usually warn you when this is
the case, but it is a useful feature
nonetheless. As a trivial example, in the
image to the left I've got a textured
cube. It may well prove easier to texture
it when it's viewed as a cube, but then
when I go back to the Edit Mesh modifier I
can stretch and distort the cube to make a
completely different shape - yet the
textures will still stay the same (as long
as I don't add/remove geometry).
Other new
features in the Max 5 geometry
manipulation toolbox include symmetry
modifier - similar to the mirror tool in
trueSpace 6; whereby you edit on side of
an object and the program will mirror it
to the other side - very useful when you
want to create symmetrical meshes
(vehicles, heads etc..).
The
majority of new features of interest here
don't actually affect the end-mesh, rather
they aid in creating it faster and easier.
Max 5 packs in several new forms of
mesh-selection tool: shrink/grow current
selection, named selection sets (similar
to, and works well with layers) and soft
selection to name but a few. Each one
alone is only a small addition, but
combined (and once you're used to them)
they will shave time off the often tedious
process of selecting many faces on a mesh.
|
Animation
3ds
max has always been a good static-modeling program
(as covered in the last section), but it has also
been a great animation package. Static models are
always going to be useful (and necessary), but complex
animation is only just starting to become as
important in the real-time graphics industries.
Like
with all similar applications Max 5 uses a method
of animation key-frames and interpolation between
them. This system can be as simple or as
complicated as you choose. At the simplest level
you can create your model, position it (and key
frame it), then move it and key-frame it again. Or
you can do the same and go to the graph editor and
alter the way in which interpolation occurs
between the two key-frames (by default it's
usually linear).
click
to enlarge
In
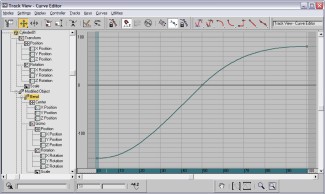
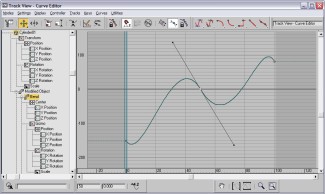
the above screenshot we can see the curve-editor,
Max 5's tool for altering the default
interpolation method. Many animation packages have
a similar tool, but Max's is the easiest to use
(from the ones I've sampled). The left-hand image
is a default curve set up by Max when I applied a
bend modifier to a cylinder, and animated the bend
over 100 frames. The right-hand image is after I
changed the in/out at each keyframe - creating the
appearance of a 'spring' in the animation around
the middle keyframe. Modifications were made
simply by selecting a keyframe and dragging it's
handles (you can see them in the screenshot). It
is possible, as you can see in the treeview, to
alter the graph for any properties of the original
geometry and it's relevant modifiers - making for
a very powerful, yet still very intuitive tool.
As
powerful as these tools get, trivial animation (as
covered above) is only 1/2 of the package - the
true power, and of most use to real-time artists
is going to be skeletal animation. This uses a
complex system of bones and physics (Inverse
Kinematics), and is where Max 5 yet again has a
chance to shine.
Bones are relatively easy to configure using
Max 5 - but mastering them is very difficult, not
because Max 5 makes it this way - rather that the
very nature of bone modeling at this level
requires a certain level of expertise. Compared
with the rest of Max 5, this is the most
complicated set of tools to use - you really do
need to know what you're doing, or at least
roughly what you need/want. Animation and Bone
modeling is one area of this program (and similar
programs) that I've not got a lot of experience in
- from a beginners point of view it was
interesting how far I could get just by guessing
which tools to use, and reading a few tutorials.
But at the end of the day, it would take much more
experience and much more skill than I currently
posses to create professional animations that I
could use in a game!
Luckily for anyone unfamiliar with this
advanced animation there are a couple of good
tutorials (including sample files) included in the
manual and training CD. Having worked my way
through these I have considerably advanced my
animating skills, but they could still be improved
further...
There are two very useful tools for real-time
modelers in the Max 5 arsenal: weight editing and
character studio 3.4.
As demonstrated in my
Direct3D8 tutorial on vertex skinning (found
here), it makes for much better animation to
use matrix-skinning effects - which are primarily
determined by weights set for each vertex used.
When dealing with bone animation in Max 5 it is a
breeze to configure these weights, and have them
exported out for use in Direct3D (as one example).
There are two routes you can use - editing
"envelopes" or directly altering the
weight table. Envelopes are literally 3D volumes
around each bone indicating how much vertices (in
the envelope) are affected by movements of that
bone, if you overlap different envelopes, you
instantly get more organic and lifelike animation.
The weight table is more complicated - envelopes
allow for a clear visual representation, but this
is just a spreadsheet of numbers: only really
useful if you need any special
changes/corrections.
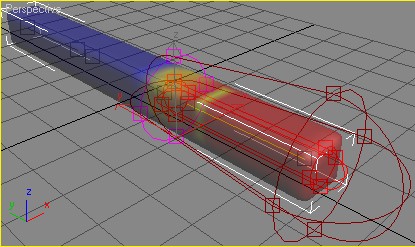
Editing Skin Envelopes: Red=higher influence,
Blue=no influence
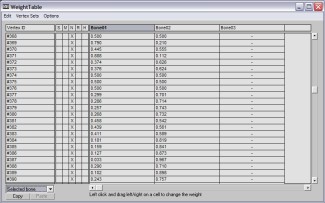
The weight table: for revising and customizing the
effect
created in the envelope system.
Character Studio
is a long-running plugin for 3ds max, due to have
it's 4th major release this autumn. To put it
simply, it allows an artist to make a biped
(human) skeletal animation very quickly - you can
just select a biped object to create, drag a box
and voila! you have yourself a human skeleton:
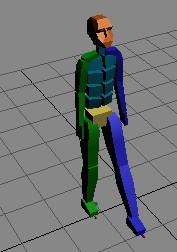
A basic
character skeleton
Character
studio still requires the artist to make the skin
for the character, but at least one of the more
complicated aspects is greatly simplified.
Inverse
Kinematics - the physics system used to manipulate
bones has also had a few new additions
implemented. Nothing hugely revolutionary, more a
case of useful tools improved or added. The
interface for handling bones has been updated
slightly - making it easier to get to the
important tools faster. A Spline IK solved has
been added - which will really help with organic
modeling of tails and snakes (for example).
Fin-editing tools have also been improved.
Previous
Page << >>
Next Page
Review
Contents:
• Page 1:
Introduction, The Full Package, The User Interface
• Page 2: Geometry Manipulation, Animation
• Page 3:
Textures/Materials, Rendering, Supporting Tools,
real-time multimedia, Conclusion
|

