|
Immediate Mode: Particle Engine and billboarding
By: Jack Hoxley
Written: sept 17th 2000
Download:
IM_Particle.Zip
(25kb)
Particle
systems are an extremely easy effect, and when used well add a great deal of
realism to the scene. Some typical uses of partical systems include: Smoke,
Vapour Trails, sparks, fireworks and flares and dirt trails behind vehicles.
The only real problem is complexity - a real smoke trail would have 1000's if
not millions of particles; whilst Direct3D can handle them up to 65,000 particles
it is almost impossible to go above 1000 in a complete game that has music,
AI, Sound and a graphical environment all happening at the same time.

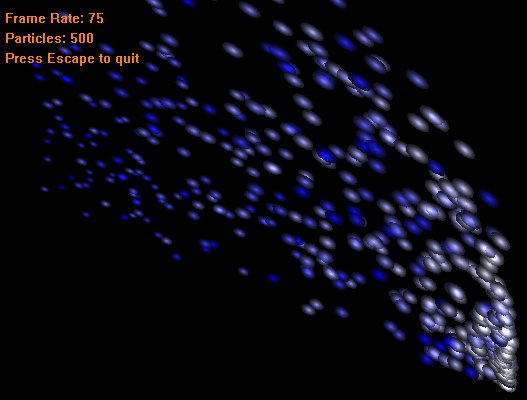
Above
is a partial screenshot showing the partical system that this tutorial demonstrates.
Although this doesn't look very realistic it is only down to the artwork - not
the program. Each particle is a single 32x32 greyscale circle - if a proper
artist drew some convincing smoke particles the above screenshot would look
a lot more realistic.
The
code behind a particle effect is very simple in theory - you only need to write
good code that works for one particle then multiply it to generate 10, 100,
1000 or n particles. I use a UDT (User-Defined-Type) to hold all the
data for my particle - it looks like this:
Private
Enum
PARTICLE_STATUS
'Under
certain
conditions
a
particle
will
cease
to
exist,
'At
which
point
we
create
it
again
as a
new
particle
from
the
origin
'This
technique
means
that
we
only
ever
need a
finite
number
of
particles
Alive
= 0
Dead =
1
End
Enum
Private
Type
Colour
'Just a simple colour wrapper...
R As
Single
G As
Single
B As
Single
End
Type
Private
Type
PARTICLE
X As
Single 'World Space Coordinates
Y As
Single
Z As
Single
vX As
Single 'Speed and Direction
vY As
Single
vZ As
Single
Color
As
Long 'Colour
sColor
As
Colour 'Start
grColor
As
Colour 'the stepvalue to generate a gradient effect
eColor
As
Colour 'End colour
LifeTime
As
Long 'How long Mr. Particle Exists
Status
As
PARTICLE_STATUS 'Does he even exist?
End
Type
Private
pList()
As
PARTICLE 'An open-ended array means we can decide later on how big we want it |
|
|
|
Now
we have the data structure we'll add some control constants. Although these
aren't really needed they simplify playing around with things later on. You
change a value here and it will be reflected throughout the entire program...
Private
Const
Gravity
As
Single
=
0.0025 'Explained Later
Private
Const
XWind
As
Single
= 0 'Explained Later
Private
Const
ZWind
As
Single
=
-0.003 'Explained Later
Private
Const
nParticles
As
Integer
= 500 'Number
of
particles
- this
number
*
4
'is
the
total
number
of
vertices
used
Private
Const
YVariation
As
Single
= 0.2 'We need some random factors involved
Private
Const
XVariation
As
Single
=
0.025 '- otherwise it'll just be a line
Private
Const
ZVariation
As
Single
=
0.025
Private
Const
LifeTime
As
Integer
= 300 'frames, at 30fps = ((1000/30)*lifetime) seconds |
|
|
|
Now
you've seen some of the source code, I'll explain how a particle system works.
First we need to understand how a single particle works, as a particle system
is just lots of singular entities...
Position
and Velocity
A particle is given an origin and a velocity - the origin will be where it starts
from, and the velocity will be a 3D vector. The velocity needs to be random,
different particles will go faster than others, and because of the way velocity
factors work, a slightly different value will result in it going in a very different
direction. When lots of particles are combined together and each one has a similiar
but different velocity they will go in the same direction but will all end up
a certain distance away from each other.
Colour
In the sample program it blends the colour between a start and end colour -
this could be used to create a weird (but cool) effect, or it could be used
to make them fade out over time (fade to black).
Gravity
without gravity the particles would just keep on going - the velocity basically
defines a straight line (of infinite length) away from the source. We use a
gravity factor to adjust the velocity over time so it appears to come back to
ground level. It should be fairly obvious that a particle goes up at a certain
speed, starts to slow down, as it slows down it levels off, and eventually starts
falling, as it falls it accelerates, and it hits the floor. This may seem extremely
difficult - but it isn't, it's extremely simple. If we assume that the initial
Y velocity is 1 (for example) and the gravity is 0.1 for every time that the
particle is updated it will decrease by 0.1: 1.0 - 0.9 - 0.8 - 0.7 and so on;
this simulates it slowing down as it gets higher up - after 10 cycles it will
be going at 0 speed - the top of our arc. Then the velocity will go into negative
numbers: -0.1, -0.2, -0.3 and so on - this will cause the particle to drop down
- and as the negative number gets bigger the faster it falls, which simulates
the increase in speed as it drops.
Wind
Wind is the last factor to be considered - gravity only works on the Y-Axis
(assuming +Y is up and -Y is down), Wind works on the X and Z axis'. I have
already discussed how the gravity factor affects the velocity - the wind factor
is identical, except it alters the X or Z axis. This method would actually result
in the wind speeding up the particles - but that doesn't bother me a great deal
- you may want to alter it so it changes the actual position rather than the
velocity.
Okay,
hopefully you now understand the basics of a particle system. The system demonstrated
here is very simple in comparison to a real one; collision is completely ignored;
in the real world a particle would hit another particle and change direction
- and when it hit the floor it would probably burn out or bounce - but then
again you have to be really picky to complain about that ;) Now we move onto
the rendering code.
At
the beginning I mentioned billboarding - this is a very simple effect in Direct3D
that is the basis of many others. A billboard is traditionally a square primative
(4 vertices) that has a 3D image applied to it in the form of a flat texture.
For example; you have a picture of a tree which you load into a texture and
display on a billboard; if this 2D billboard is rotated so it faces the camera
it will look like there is a 3D tree in the scene. When viewed up close they
fail to convince anyone - but from a distance they can be very effective, and
a saver of much needed processing time (4 vertices for a billboard or 400 for
a tree?). The only difficult aspect of billboarding is getting it to rotate
so it exactly faces the camera. The sample code has a fixed camera so doesn't
need to work out the angle (it's always 45 degrees), but should you need to
work it out, this is how:

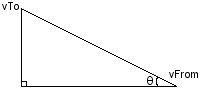
Out
good friend Trigonometry. We will need to rotate the billboard around the Y
axis using the angle q. We will need to make up some lengths for our triangle;
this will depend on how your program is structured - but this method should
be fine:
We'll
assume that the adjacent side is on the X axis and the Opposite side is on the
Z axis, but they work interchangeably.
Tanq
= Opp/Adj
q
= (vTo.z - vFrom.z) / (vTo.x - vFrom.x)
Although
I haven't checked this code, it should work - correct me if I'm wrong [Email].
You should be able to apply the simple laws of trigonometry to work out the angle
should the camera not be a single rotation....
Now
we move onto the particle update code, which is extremely simple as well, and
looks like this:
Private
Sub
RenderParticlesTextured()
Static
N As
Long
For N
= 0 To
nParticles
- 1
If
pList(N).Status
=
Alive
Then 'we want to update it
'################
'## UPDATE COLOUR ##
'################
pList(N).sColor.R
=
pList(N).sColor.R
+
pList(N).grColor.R
pList(N).sColor.G
=
pList(N).sColor.G
+
pList(N).grColor.G
pList(N).sColor.B
=
pList(N).sColor.B
+
pList(N).grColor.B
pList(N).Color
=
dx.CreateColorRGB(pList(N).sColor.R,
pList(N).sColor.G,
pList(N).sColor.B)
'################
'## Update Position ##
'###############
pList(N).X
=
pList(N).X
+
pList(N).vX 'Update the actual
pList(N).Y
=
pList(N).Y
+
pList(N).vY 'position first
pList(N).Z
=
pList(N).Z
+
pList(N).vZ
pList(N).vY
=
pList(N).vY
-
Gravity 'then alter the vector
pList(N).vX
=
pList(N).vX
+
XWind 'this wont take effect until
pList(N).vZ
=
pList(N).vZ
+
ZWind 'the next frame
'####################
'## Check/Update Lifetime ##
'####################
pList(N).LifeTime
=
pList(N).LifeTime
- 1
If
pList(N).LifeTime
<=
1 Then
pList(N).Status
= Dead
'##################
'## Boundary Checking ##
'#################
If
pList(N).Y
<=
0 Then
pList(N).Status
= Dead 'we'll take 0 as being ground level
Else 'if it's dead we want to create a new on
'############################
'## Create a New particle at the origin ##
'############################
pList(N).Status
=
Alive
pList(N).Color
=
dx.CreateColorRGB(1,
1,
1)
'Start
off
red
pList(N).sColor.R
= 1
pList(N).sColor.G
= 1
pList(N).sColor.B
= 1
pList(N).eColor.R
= 0
pList(N).eColor.G
= 0
pList(N).eColor.B
= 1
pList(N).X
= 0
pList(N).Y
= 0
pList(N).Z
= 0
pList(N).vX
= (Rnd
*
XVariation)
- (XVariation
/ 2)
pList(N).vY
= (Rnd
*
YVariation)
pList(N).vZ
= (Rnd
*
ZVariation)
- (ZVariation
/ 2)
pList(N).LifeTime
=
Int(Rnd
* (LifeTime
- 2))
+ 2
pList(N).grColor.R
= (pList(N).eColor.R
-
pList(N).sColor.R)
/
pList(N).LifeTime
pList(N).grColor.G
= (pList(N).eColor.G
-
pList(N).sColor.G)
/
pList(N).LifeTime
pList(N).grColor.B
= (pList(N).eColor.B
-
pList(N).sColor.B)
/
pList(N).LifeTime
End If
'###################
'## Copy Data to Vertex ##
'##################
'Source Vertex -Not rendered
Call
dx.CreateD3DLVertex(pList(N).X,
pList(N).Y,
pList(N).Z,
pList(N).Color,
1, 0,
0,
vertexList(N))
'We need 4 vertices to define a
square around our particle, matrix maths sorts out the
'billboarding required.
'1-2
'3-4
'is the order they must be created
'alter the +-0.1 to change the particle size
Call
dx.CreateD3DLVertex((pList(N).X
+
0.1),
(pList(N).Y
+
0.1),
(pList(N).Z
-
0.1),
pList(N).Color,
_
1, 0,
0,
VertexListTex(N).Vertices(0))
Call
dx.CreateD3DLVertex((pList(N).X
-
0.1),
(pList(N).Y
+
0.1),
(pList(N).Z
-
0.1),
pList(N).Color,
_
1, 0,
1,
VertexListTex(N).Vertices(1))
Call
dx.CreateD3DLVertex((pList(N).X
+
0.1),
(pList(N).Y
-
0.1),
(pList(N).Z
+
0.1),
pList(N).Color,
_
1, 1,
0,
VertexListTex(N).Vertices(2))
Call
dx.CreateD3DLVertex((pList(N).X
-
0.1),
(pList(N).Y
-
0.1),
(pList(N).Z
+
0.1),
pList(N).Color,
_
1, 1,
1,
VertexListTex(N).Vertices(3))
Next N
End
Sub |
|
|
|
When
this function is called we [should] see a particle stream appear. Download the
source code from the top of this page or from the downloads
page to see it in action...
|

